どうもこんにちは。HRBrain でフロントエンドエンジニアをやっていますちゃんかつ(https://twitter.com/tyankatsu5)です。 最近冷えてきましたね。みなさんは夏らしいことしましたか?
HRBrain ではドメイン知識を持った機能(例えば各サービスのアイコン)を Stencil.js で作った WebComponents(以下 WC)で実現しています。
なぜ Stencil.js なのか気になる方は弊社 CTO の yudppp(https://twitter.com/yudppp)の技術検証記事を参照してください(https://blog.yudppp.com/posts/webcomponents-2019)。 弊社の Podcast「ノウナイラジオ」で yudppp がゲストの回でもちらっとこの話が出てきます。 https://anchor.fm/hrbrain/episodes/Episode1-HRBrainCTOHRBrain-eqfqmt
各コンポーネントを確認するために Storybook を開発フローに取り込んでいますが、Storybook はこの記事執筆時点(2021 年 10 月 19 日)では公式に Stencil.js をサポートしていません。
issue 概要のリアクション数を見る感じ、とても待ち望まれているように見えますが、まだサポートが発表されていません。 https://github.com/storybookjs/storybook/issues/4600
この記事では Stencil.js と Storybook の組み合わせ方を紹介し、いくつか注意事項を併せて紹介します。
また、皆さんの手元で確認しやすいように repository を用意しています。ご活用ください。https://github.com/hrbrain/tech-blog-stenciljs-storybook
記事執筆時点での諸々のバージョンは以下の通りです。
- Node.js ... 12.22.6
- npm ... 6.14.15
- @stencil/core ... 2.9.0
- Storybook ... 6.3.12
とりあえず何かコンポーネント追加する
まずは Stencil.js でコンポーネントを作りましょう。
今回は、弊社 HRBrain の各サービスの英語表記と日本語表記のマッピングによって、表示する文字を変えるservice-nameというコンポーネントを作成します。
弊社では以下のようなサービスを展開しています。
- https://www.hrbrain.jp/feature/members
- https://www.hrbrain.jp/feature/evaluation
- https://www.hrbrain.jp/feature/teams
- https://www.hrbrain.jp/feature/placement
- https://www.hrbrain.jp/feature/survey
例えば「members」では「人材データベース」というように、英語表記と日本語表記が決められています。ここの表記ゆれを防ぐために、WC で props に渡した英語表記によって、日本語表記でサービス名を表示するコンポーネントです。
npm init stencilでcomponentモードで作っていきます。
import { Component, Host, h, Prop } from "@stencil/core";

import { serviceMaps, ServiceMapsKeys } from "./facade";

@Component({
  tag: "service-name",
  styleUrl: "service-name.css",
  shadow: true,
})
export class ServiceName {
  @Prop() service: ServiceMapsKeys = "evaluation";

  render() {
    return (
      <Host>
        <p class="text">{serviceMaps[this.service]}</p>
      </Host>
    );
  }
}
Stencil.js は、コンポーネントファイルは
@Component以外 export を許可していません。helper のようなものを export したい場合は、別のファイルに記述する必要があります。https://stenciljs.com/docs/module-bundling また、Stencil.js は src/components.d.ts に型定義を自動生成してくれます。便利なのですが、これのせいで object をコンポーネントファイルで import し、object から型を作って使いたい場合(例えば、keyof typeof serviceMaps)、components.d.ts は object を import しないので無視します。別ファイルに型を定義して、コンポーネントファイルで import すると解決できるので、helper のようなものの型定義も別ファイルに記述しておく必要があります。
{
  "scripts": {
    "start": "stencil build --dev --watch --serve"
  }
}
start で index.html が起動するので、試してみます。
<!DOCTYPE html>
<html dir="ltr" lang="en">
  <head>
    <meta charset="utf-8" />
    <meta
      name="viewport"
      content="width=device-width, initial-scale=1.0, minimum-scale=1.0, maximum-scale=5.0"
    />
    <title>Stencil Component Starter</title>

    <script
      type="module"
      src="/build/tech-blog-stenciljs-storybook.esm.js"
    ></script>
    <script nomodule src="/build/tech-blog-stenciljs-storybook.js"></script>
  </head>
  <body>
    <service-name service="members"></service-name>
    <service-name service="evaluation"></service-name>
    <service-name service="teams"></service-name>
    <service-name service="placement"></service-name>
    <service-name service="survey"></service-name>
  </body>
</html>

表示されました。
表示されたのは良いのですが、サービスを足す度に index.html に追記していくのもとても手間です。やはり Storybook を使いたくなります。それでは、Storybook を使えるようにしていきましょう。
Storybook で html を前提として init する
Storybook を導入します。
web-components という選択肢がありますが、ここでは html として扱います。
@storybook/web-components だと、
Field 'browser' doesn't contain a valid alias configurationというエラーが出ます。エイリアスが貼れていないから出るエラーだと思いますが、詳しく調査していません。もしかしたら@storybook/html でも@storybook/web-components でも動く可能性があります。
npx sb initで html を選ぶと作られる.storybook/preview.js に以下を追加します。
const { configure } = require("@storybook/html");
const loader = require("../loader/index.cjs.js");

const loadWebComponents = () => loader.defineCustomElements(window);

configure(loadWebComponents, module);
Stencil.js をビルドすると作られるloaderとdistが必要になるので、一度手元でnpm run buildでビルドします。
loader は様々な環境で WC を使うことを想定したエントリーです。
Storybook は CommonJS で動くことを想定しているので、今回は index.cjs.js を使います。
custom elements を使えるように window に定義し、Storybook の「Canvas」タブに組み込みます。
import { Components } from "../../components";
import { serviceMaps } from "./facade";
import notes from "./readme.md";

import { embedArgs } from "../../shared/utilities";

// =========================================
// setup
// =========================================

export default {
  title: "service-name",
  parameters: {
    notes,
  },
  argTypes: {
    service: {
      control: {
        type: "select",
        options: Object.keys(serviceMaps),
      },
    },
  },
};

const Template = (args: Components.ServiceName) =>
  `<service-name ${embedArgs(args)} ></service-name>`;

// =========================================
// stories
// =========================================

export const Primary = Template.bind({});

Primary.args = {
  service: "members",
} as Components.ServiceName;
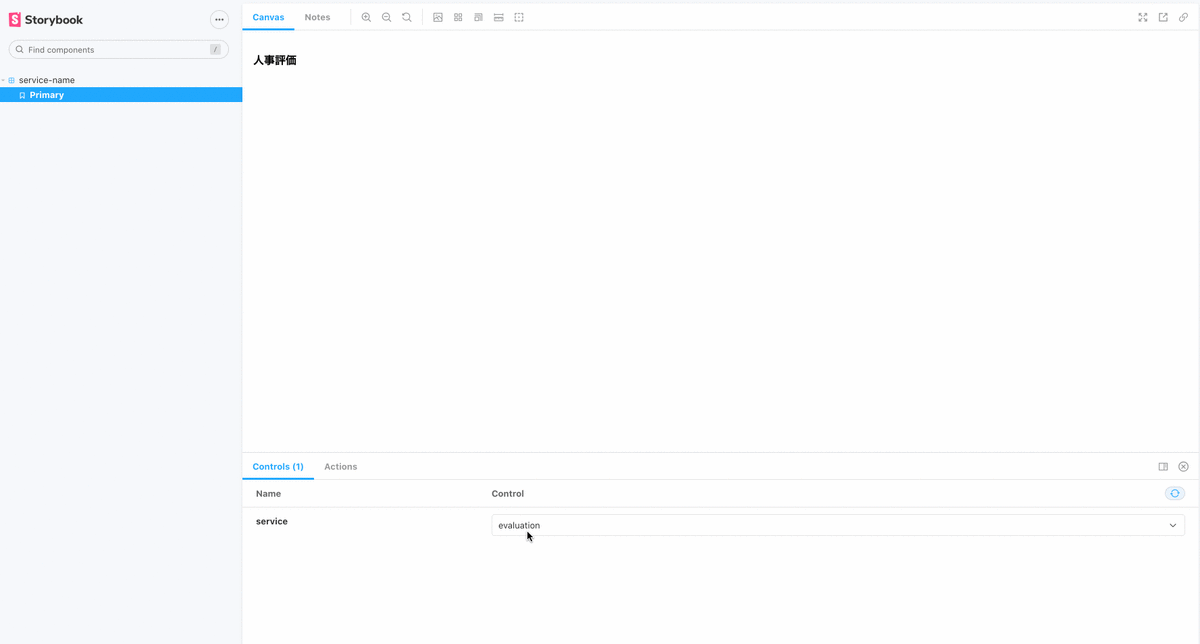
Storybook で環境が作れました 👏
embedArgs の箇所は次のセクションで解説します。
props として渡す引数を object から string に変換する
Storybook の Component Story Format(CSF)は args を object で受け取るので、文字列な props を期待している custom elements とは相性が悪いです。そのため、object な args を文字列に変換する処理を噛ましてあげます。
/**
 * @example
 * toKebab('memberId')
 * // => 'member-id'
 */
const toKebab = (letter: string) => {
  return letter
    .split("")
    .map((char, index) => {
      return char.toUpperCase() === char
        ? `${index !== 0 ? "-" : ""}${char.toLowerCase()}`
        : char;
    })
    .join("");
};

/**
 * 引数に渡したオブジェクトをcustom elementsのatttributeの形に展開する
 * @example
 * const args = {
 *   name: 'John',
 *   id: '1E7D8C50-1CEE-465E-8EE5-60B66C0319F7'
 * }
 *
 * <my-component {embedArgs(args)}></my-component>
 * // => <my-component name="John" id="1E7D8C50-1CEE-465E-8EE5-60B66C0319F7"></my-component>
 */
export const embedArgs = <T extends object>(args: T) =>
  Object.entries(args)
    .map(([key, value]) => {
      const parsedKey = toKebab(key);
      return `${parsedKey}=${JSON.stringify(value)}`;
    })
    .join(" ");
import { embedArgs } from "./storybook";

describe("storybook", () => {
  describe("embedArgs", () => {
    it("when input object as args of component, then return args as string", () => {
      const args = {
        name: "太郎",
        age: 20,
      };

      const result = embedArgs(args);

      expect(result).toBe('name="太郎" age=20');
    });
  });
});
テストを見てもらうとイメージ付きやすいと思います。custom elements が受け取れる形に args が整形されています。
これで無事に Storybook 対応が終わりました 👏
「Controls」でポチポチしてもちゃんと値が変わります。
Tips
ここからは Tips の紹介です。
コンポーネントに依存する処理はどんどん外に出そう
Stencil.js でコンポーネントを作る時は helper の処理は外に出さないと、
To allow efficient bundling, modules using @Component() can only have a single export which is the component
class itself. Any other exports should be moved to a separate file. For further information check out:
https://stenciljs.com/docs/module-bundling
と怒られるのですが、export しなければ実装出来ます。
import { Component, Host, h, Prop } from "@stencil/core";

const serviceMaps = {
  members: "人材データベース",
  evaluation: "人事評価",
  teams: "組織図ツリー",
  placement: "組織分析",
  survey: "アンケート",
};

@Component({
  tag: "service-name",
  styleUrl: "service-name.css",
  shadow: true,
})
export class ServiceName {
  @Prop() service = serviceMaps["evaluation"];

  render() {
    return (
      <Host>
        <p class="text">{serviceMaps[this.service]}</p>
      </Host>
    );
  }
}
でもぶっちゃけ実装できてしまいます。
@Prop() service = serviceMaps['evaluation'];が string 型にはなっちゃいますけどね
しかし、story ファイルで使いたい場合も考えて、責務の分離なんかも視野に入れつつ、できるだけファイルを分けて実装の詳細を隠してしまいましょう。
module.ts でも helper.ts でも facade.ts でもなんでもいいので外に出しちゃいましょう。
Stencil.js が作ってくれる readme.md を有効活用しよう
Stencil.js はコンポーネントファイルを見て、readme.mdというファイルを自動生成してくれます。
幸い Storybook は markdown を取り込むことができる addon @storybook/addon-notesを提供しています。ありがたく使いましょう。
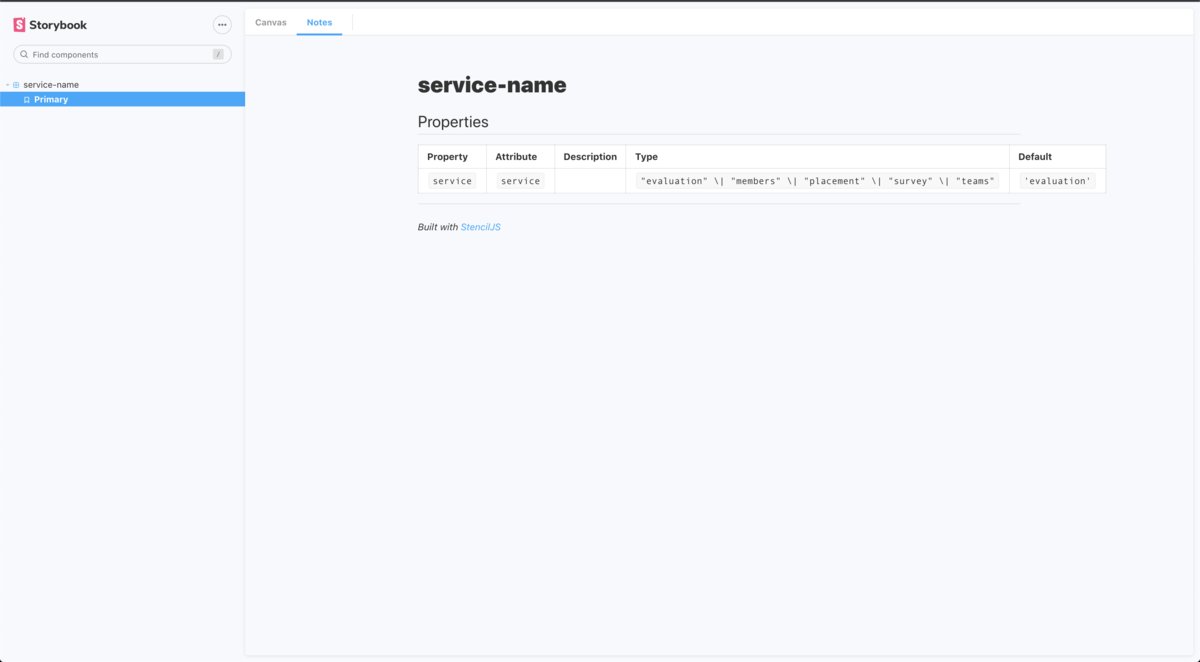
Storybook で情報が完結するので嬉しいです 👏
story ファイルを自動生成させよう
Stencil.js にはgenerateコマンドがありますが、カスタマイズは現在できません。
https://github.com/ionic-team/stencil/issues/2507
npm-run-all(https://github.com/mysticatea/npm-run-all)なんかを使って、直列処理で generate したあとに story ファイルを hygen(https://github.com/jondot/hygen)などで生成するといったことをして、story ファイルの追加の手間を減らしましょう。
最後に
弊社 HRBrain では、いろいろ模索しながら開発効率を上げる手段を探す機会が度々発生します。そういった「まだまだ改善の余地がある、しかし手段はいくらでもある。どれが現在の最適な手段なのかを考えて、率先して手を動かすことができる」エンジニアを募集しています。
ぜひ一緒にさまざまな問題に立ち向かっていきましょう!