Hello, This is Zzem from team rabbit. This article is the 4th-day article of HRBrain Advent Calendar 2021.
Background
Like many others, I am a Vim guy. I stay in the terminal and use the keyboard most of the time for development. It's very annoying to use the mouse when I am in a flow. When there is a need to adjust the volume and sound mixing of my pc I have to switch to the mouse which is a little bit annoying for me.
So I was thinking what if I make a terminal application by which I can manage the sound mixing and adjust the volume. So I started a hobby project. Though currently, It can only do the simple task of adjusting the speaker volume in the future, it has some potential to grow.
Let's Start
I will use Golang as a language tool to create the application. Two Go library is also necessary to do the job. One is volume-go and the other one is termui for terminal UI support written in go
Let's get the two dependencies by the below commands.
go get github.com/itchyny/volume-go
go get github.com/gizak/termui
Let's create a new project I named it as voltui in the src folder of the gopath.
Now create a main.go file and inside the main function we will initialize the UI for the terminal user interface. We are using termui go package for this purpose.
func main(){
    if err := ui.Init(); err != nil {
        log.Fatalf("failed to initialize termui: %v", err)
    }
   defer ui.Close()
Now our terminal application there should have an instruction section in the display so the user can properly use the application.
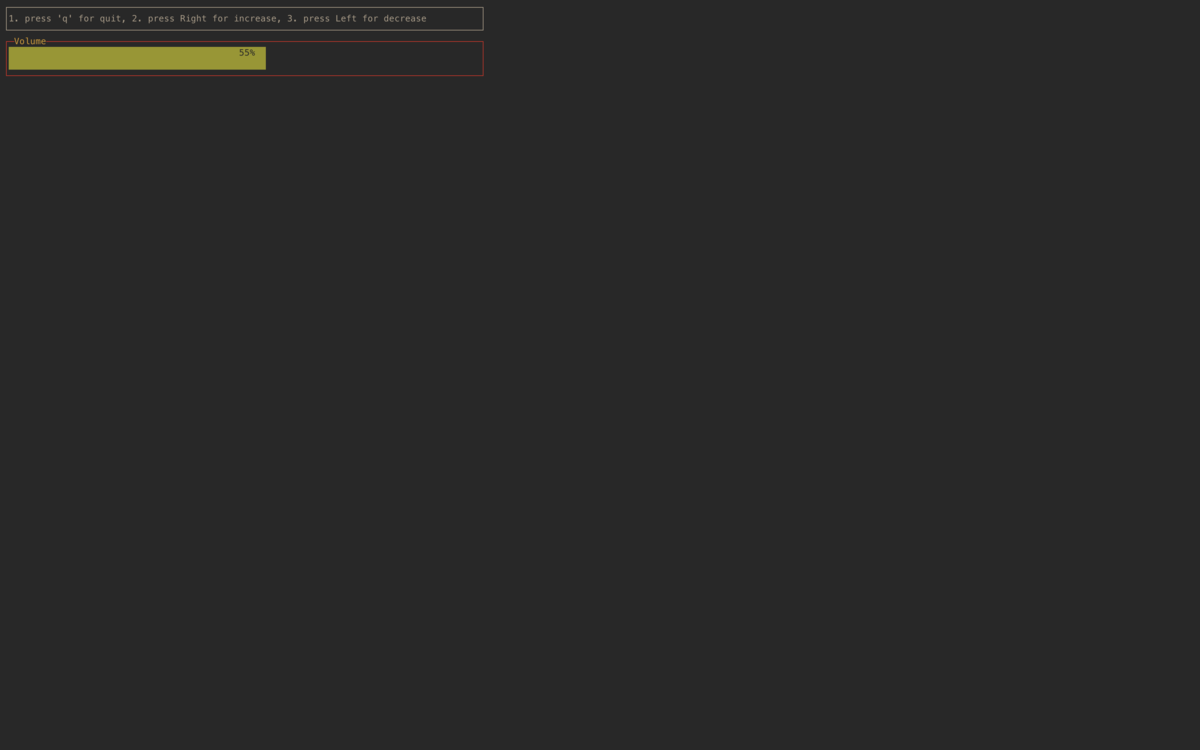
Following the termui documentation now we will create a paragraph with a rectangle box that will contain the instructions. Currently, there are only three instructions.
- press 'q' for quit the application
- press 'Right' to increase the volume.
- press 'Left' to decrease the volume.
for this purpose will create a function called helpDialog which will instantiate a paragraph widget with necessary settings and also with the instructions string.
func helpDialog() *widgets.Paragraph {
    p := widgets.NewParagraph()
    p.Text = `1. press 'q' for quit, 2. press Right for increase, 3. press Left for decrease`
    p.SetRect(0, 0, 90, 3)
    return p
}
Now we are going to draw the percentage and volume bar. For this we will use the Gauge widget of the termui. The below function will create a Gauge and set necessary settings to make the Gauge volume bar functional.
func volumeBarDialog(vol int) *widgets.Gauge {
    g0 := widgets.NewGauge()
    g0.Title = "Volume"
    g0.SetRect(0, 3, 90, 7)
    g0.Percent = vol
    g0.BarColor = ui.ColorGreen
    g0.BorderStyle.Fg = ui.ColorRed
    g0.TitleStyle.Fg = ui.ColorYellow
    return g0
}
the above function is taking a parameter called vol. So now we have to get the volume of the pc. For this purpose, we are going to take help from the volume-go package.
vol, err := volgo.GetVolume()
if err != nil {
    panic("error")
}
we are almost done. We have almost everything we need. But what about the events that will be performed when Right and Left button are pressed. Let's write a simple code with help of termui to get the keypress of Right and Left key and do some actions.
    uiEvents := ui.PollEvents()
    for {
        e := <-uiEvents
        eid := e.ID
        switch eid {
        case "q", "<C-c>":
            return
        case "<Right>":
            {
                if vol <= 95 {
                    volgo.IncreaseVolume(5)
                    vol += 5
                    g0.Percent = vol
                    draw(p, g0)

                }
            }
        case "<Left>":
            {
                if vol >= 5 {
                    volgo.IncreaseVolume(-5)
                    vol -= 5
                    g0.Percent = vol
                    draw(p, g0)

                }
            }
        }
    }
If we notice there have a function called draw which actually clears the screen and renders the widgets in the terminal. Let's create it.
func draw(drawables ...ui.Drawable) {
    ui.Clear()
    ui.Render(drawables...)
}
Now we are set let's glue all the parts and see how it looks.
package main

import (
    "log"

    ui "github.com/gizak/termui/v3"
    "github.com/gizak/termui/v3/widgets"
    volgo "github.com/itchyny/volume-go"
)

func main() {
    if err := ui.Init(); err != nil {
        log.Fatalf("failed to initialize termui: %v", err)
    }
    defer ui.Close()

    p := helpDialog()

    vol, err := volgo.GetVolume()
    if err != nil {
        panic("error")
    }

    g0 := volumeBarDialog(vol)

    draw(p, g0)

    uiEvents := ui.PollEvents()
    for {
        e := <-uiEvents
        eid := e.ID
        switch eid {
        case "q", "<C-c>":
            return
        case "<Right>":
            {
                if vol <= 95 {
                    volgo.IncreaseVolume(5)
                    vol += 5
                    g0.Percent = vol
                    draw(p, g0)

                }
            }
        case "<Left>":
            {
                if vol >= 5 {
                    volgo.IncreaseVolume(-5)
                    vol -= 5
                    g0.Percent = vol
                    draw(p, g0)

                }
            }
        }
    }
}

func helpDialog() *widgets.Paragraph {
    p := widgets.NewParagraph()
    p.Text = `1. press 'q' for quit, 2. press Right for increase, 3. press Left for decrease`
    p.SetRect(0, 0, 90, 3)
    return p
}

func volumeBarDialog(vol int) *widgets.Gauge {
    g0 := widgets.NewGauge()
    g0.Title = "Volume"
    g0.SetRect(0, 3, 90, 7)
    g0.Percent = vol
    g0.BarColor = ui.ColorGreen
    g0.BorderStyle.Fg = ui.ColorRed
    g0.TitleStyle.Fg = ui.ColorYellow
    return g0
}

func draw(drawables ...ui.Drawable) {
    ui.Clear()
    ui.Render(drawables...)
}
We are done. Now just run the main.go file from the terminal. Or we can install it for accessing it from anywhere.
Now let's see how it looks in action.
If you want you can install it using the below command.
go install github.com/mowazzem/voltui
What's Now?
From now I have a plan to make this funny project funnier. Let's say what if voltui has an audio visualizer and mixer to play with it ;-).